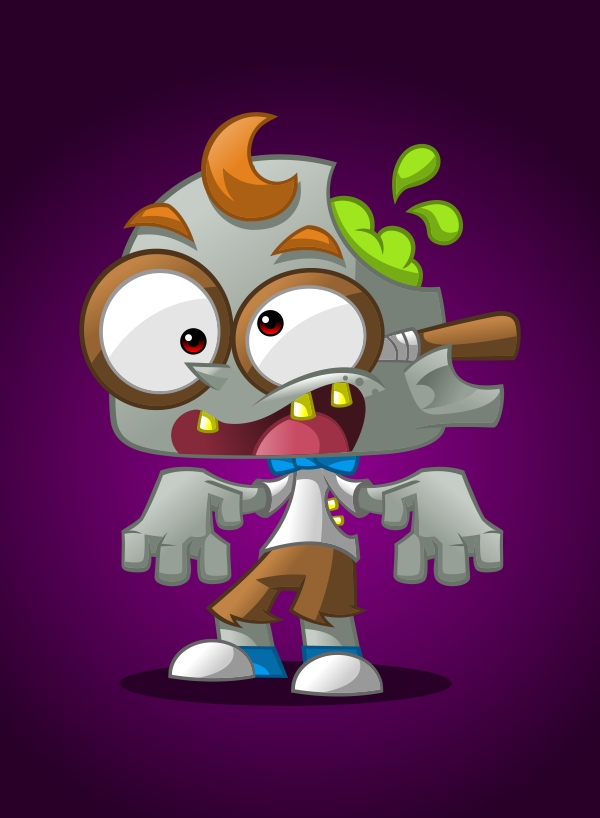
In this tutorial you'll learn how to create a Geek Zombie Mascot from the basic sketch composition to CorelDRAW vector rendering. We'll color our mascot with simple techniques and process making it safe for saving our file in Adobe Illustrator.
Step 1
Let's start drawing the head by making a circle and sketching a guideline to map-out the placement of facial features and the height. Add a line of action to give more fluidity on the figure of the mascot.
Inside the circle, draw a vertical curve at the center line by two-thirds to the left and a horizontal line for the eye level. Draw a straight guideline less than heads at the bottom to determine the height of the character. For the action line, draw half a circle or a letter C backwards to show the weak/slouching posture.

Step 2
Use simple shapes like rectangles, ellipses and triangles as guides to compose the structure of the mascot. Play around with the shapes to go with the line of action. Bend, distort, cut and curve out the shapes to form details for each body parts.

Step 3
Add details to the character and showcase the obvious features a Geek Zombie Mascot should have. We'll add a pair of glasses, a bow tie, torn up clothes and ripped flesh with ribs popping out.
Clean up the sketch and get it ready for vector rendering.

Step 4
Let's open CorelDRAW and set-up our sketch.
- Create a new blank document and set the page size to A4 and measuring units in Pixels.
- Go to the folder where you have saved the sketch and just drag the image to the artboard.
- Using the Pick Tool (Ctrl + Space Bar), click on the sketch and go to Arrange > Align and Distribute > Center To Page or just press the shortcut key (P) to place the image at the center of the artboard.
- Go to the toolbox located by default at the left side of the screen and long press the Interactive tools icon to show more options. Select Transparency and set the sketch opacity to 75%.
- Right click the sketch and select Lock Object or go to Arrange > Lock Object.

Step 5
This step covers the process of rendering our sketch into vector. Each group will contain an outline, base color, and shadow to form a specific body part. We'll start with the left frame of the eyeglasses.
- First, draw a circle using an Ellipse Tool (F7) tracing the sketch to create our base color.
- Next, we'll draw our outline color instead of just using strokes. Create another circle slightly larger than our base color. Back One (Ctrl + PgDn) to move behind our base color position. Play around with the shape to create varied outline width.
- Draw a source object overlapping the base color to create the shadow. Select the source object, hold down Shift, select the base color and click Intersect button on the property bar. This creates a new object which is our shadow on the area where the source object and base color overlaps. Remove the source object.
- Now we are going to assign colors. To apply linear gradient fill on our base color, click the Interactive fill tool on the Toolbox, set the fill type to Linear and drag diagonally from top left to bottom right. Assign our highlight color on the top left and main color on the bottom right. Click the shadow object, select a darker color closest to the main color and more darker fill to color our outline.
- Now select all object, Group (Ctrl + G) and set the outline width on the Property bar to None.
Frame base color: R=150, G=100, B=50.

We're going to choose different shades using our base color. To set our highlight color, shadow and outline, click and hold a color swatch to display a pop-up color picker, then click a color.

Step 6
Duplicate (Ctrl + D) the eyeglasses frame, scale down and position to create our lens. Ctrl-Click to select an object in the group and change the colors. Click the lens, hold down Shift and select the frame, then Group (Ctrl + G).
Lens base color: White

Step 7
To create the right side of the eyeglasses, simply Duplicate the left and position the copy to the right. Stretch down horizontally and Click twice to see a rotation handle around the corners, hold Click and move the mouse to rotate until it fits same as the sketch.

Step 8
Follow Step 5 to draw the temple but instead of using the Ellipse Tool, we're going to trace the sketch using the Bezier Tool.
Assign nodes first following the shape of the temple. Using the Shape Tool (F10), select all nodes (Ctrl + A) and click Convert to Curve on the Property bar. Change Node types on the Property bar by clicking Cusp for corners and Smooth for curves to form the shape.
Temple base color: R=150, G=100, B=50.

Step 9
To create the bandage accessory on the eyeglasses, Create 3 strips first tracing the sketch, select the 3 strips and click Weld on the Property bar to combine into one object. Follow Step 8 to complete the rest.
Bandage base color: 20% Black

Step 10
Select the bandage accessory and the temple and Back one (Ctrl + PgDn) to move behind the eyeglasses. Select all the eyeglasses parts and Group (Ctrl + G).

Step 11
Create 4 circles using the Ellipse tool (F7) tracing the size on the sketch to draw the eye. The largest circle will be our outline, next within are the pupil, Iris, and the smallest circle is the white spot. Next, assign colors, Group (Ctrl + G) and set Outline to width to None.
Duplicate (Ctrl + D) and place the copy on the other side, position based on the sketch. Select the left and the right eye, and Group (Ctrl + G).
Assign colors Outline: Black, Iris: Interactive Fill 10% Black - Red, Pupil: Black , Spot: White.

Step 12
Follow Step 8 to draw the tooth and tongue.
Duplicate (Ctrl + D) to easily make copies of the tooth, position based on the sketch and stretch to create varied sizes. Select all tooth and Group (Ctrl + G)
Tooth base color: Light Yellow
Tongue base color: R=200, G=75, B=100.

Step 13
Draw the shape of the mouth and click the Interactive Fill Tool to color. Set the Fountain fill type to Linear. From left to right on the Blend Tool, pick R=130, G=40, B=40 and R=130, G=20, B=30 from the color swatch. Remove the outline and Back one (Ctrl + PgDn) to move behind the teeth and tongue.

Step 14
Group (Ctrl + G) and select the teeth and tongue. Next, go to Effects > Power Clip > Place Inside Container and click the mouth to Place Inside Container (Ctrl + 1)

Step 15
Follow Step 8 to draw the nose, cheek and ear. Play around with the nodes of the outline shape to hide a corner and create varied outline weights.
Group each object and Back one (Ctrl + PgDn) to move position behind the mouth.
Skin Base color: R=150, G=160, B=150.

Step 16
Follow Step 8 to draw the hair and the right eyebrow. Duplicate (Ctrl + D) the right eyebrow to make a quick copy for the left eyebrow. Position the copy and click Mirror Horizontally on the Property bar to flip the object from left to right. Stretch and rotate a just little.
Base Color: R=230, G=130, B=30.

Step 17
Let's create a shadow for the hair and eyebrow at the bottom right.
Duplicate (Ctrl + D) the hair & eyebrows and click the Weld icon at the Property bar to combine objects into a single curve object. Back one (Ctrl + PgDn) to move the shadow behind and edit the shape not to exceed outside the skin.
Use the Color Eyedropper icon on the Toolbox to change fill same as the skin's shadow color.

Step 18
Start drawing the head by using an Ellipse Tool, then Right-click the circle and select Convert to curves (Ctrl + Q) to manipulate the nodes. Using the Shape Tool (F10), you can add nodes just by Double-clicking the curve. Select nodes and click Cusp or Smooth on the property bar to form the shape of the head.

Step 19
Draw the brain and the two tear drop shapes. Start by tracing the shapes and click Weld on the Property bar to combine. Follow Step 8 with the rest of the process and Back one (Ctrl + PgDn) to move the brain behind the head.

Step 20
Now we're finished coloring the head. Select all objects (Ctrl + A) and Group (Ctrl + G).
The rest of the coloring technique will follow Step 8 using Bezier tool to render the sketch. For some body parts with similarities like the arms, legs and shoes, we'll render one side first and use Duplicate (Ctrl + D) to create a copy and transform.

Step 21
Draw the right wing of the bow tie first, then Duplicate (Ctrl + D) twice to make a copy for the knot and left wing. Select the copies and click Flip horizontal on the Property bar. Position and Back one (Ctrl + PgDN) below the right wing.
Select all the tie parts then Group (Ctrl + G) and Back One (Ctrl + PgDn) to move layer position behind the head.
Base Color: R=230, G=130, B=30.

Step 22
Draw the shirt, pants and ribs. Select, Group (Ctrl + G) and Back one (Ctrl + PgDn) to move layer position below the bow tie.
Shirt base color: 20% Black
Ribs base color: Yellow
Base color: R=150, G=100, B=50.

Step 23
We'll draw the right side arm composed of the sleeve, arm and hand. Group (Ctrl + G) and back one (Ctrl + PgDn) to position behind the bow tie. Duplicate to make a copy for the left arm and Back-one (Ctrl + PgDn) again to position behind the shirt.
Shirt base color: 20% Black
Skin base color: R=150, G=160, B=150.

Step 24
Draw the shin on the left leg then duplicate and stretch down to create the shoe. Change the color of the shoe and draw half a circle for the toe cap. Next, Group (Ctrl + G) the shin and shoe objects then Duplicate (Ctrl + D) to make a copy for the left. Ctrl-click the toe cap and move at the center following the placement based on the sketch. Group both legs and Back one (Ctrl + PgDn) to position layer behind the pants.
Skin base color: R=150, G=160, B=150.
Shoe base color: R=230, G=130, B=30.
Toe Cap base color: 20% Black

Step 25
Now we're finished coloring the sketch.
Select all objects (Ctrl + A) and Group (Ctrl + G). Right click on the bitmap sketch, select Unlock Object and remove (DEL).

Step 26
The process we've used in coloring our mascot is safe for saving in Adobe Illustrator. Go to File > Save as > Save As Type: Adobe Illustrator AI and click Save.
We used only RGB colors and simple gradients to color our mascot. As much as possible, try to avoid any bitmap effects or transparencies.
All our grouped objects/body parts are preserved in layers. We just need to rename layers and check for some misaligned gradient fills.

Conclusion
The process is fairly easy. Just focus on Steps 5 and 8 to form any object. You can start applying this technique on simple sketches and develop further by adding more details.