
Today's Quick Tip aims to assist the minority of illustrators using Corel Draw for creating mickrostock vectors. You will learn the best way to save Adobe compatible files from Corel and how to organize and export images for the major stock agencies. Let's get started!
Introduction : Learning from Experience
Lets see if I understood you correctly: You are saying you use Corel Draw to create vectors for the microstock agencies, right? Excellent choice my friend! I see you have a good taste. You are very brave too I must add. Why brave? Because it is an Adobe world we are living in. Everybody who creates content in Corel - knowing that it will most likely be viewed in Adobe software - is brave in my eyes. I mean, just think of all the things which could go wrong: Your files may not be compatible, colors may not look the same as when you created them. well, I guess that's it.

Looks like it is not as bad as I though. Nevertheless if you are serious about your microstock work, don't even begin to draw before you have mastered the techniques to deal with these two issues. Trust me on this one! I've lost a lot of time (and more) just because I was rushing to draw and upload, and did not pay attention to the fact that there are big differences between Corel and Illustrator. I don't want you to go through the same thing, this is why I am sharing my humble experience with you.
So lets start with saving your files first.
100 Million Corel Users Worldwide
For Corel users this issue is a blessing in disguise. "A gift, wrapped in a problem", as they say. It is a problem, because the standard for vector files that are accepted by the microstock agencies is set by Adobe Illustrator. Why is this so? Well, not because Illustrator is better than Corel, but because of Illustrators' big brother - Photoshop.

Adobe Photoshop is so great that it paved the way for Illustrator and the rest of its little siblings, and now they rule. But how can this be an advantage for Corel users? Well, first of all, compared to Adobe users - our group may look relatively small. But according to statistics this small group is actually over 100 million strong. Yeah, that's right - today over 100 million people use Corel software in 75 countries around the world. Often those people have problems with using Adobe Illustrator files. Many Illustrator users just ignore that number (100 000 000) and act like everybody can open their illustrations, created with the latest AI version. They use meshes, transparencies, shadows, save files in higher versions and so on. The result is that in many cases a Corel user can not even see what they (AI artists) have created. But when YOU create something, it will be viewed easily by Corel users, Adobe users, Freehand users and everybody else. Isn't that a nice advantage? :)
Saving Different File Types
So when I draw something, I usually save it in the following file formats: CDR, AI, EPS, JPEG and PSD. Not all the microstock agencies accept all of these types, but nevertheless it pays to send as many of the files as are accepted. You can do that with graphicriver.net, istockphoto.com and fotolia.com for example.

Before I get into details I must know what version of Corel Draw are you using. Well, obviously you can't tell me, so I assume you are using Corel Draw 12, Corel Draw X4 or Corel Draw X5. The examples and screenshots in this Quick Tip will be for those three. If you are using an older version - they are not that much different from 12, so I believe you can follow this tutorial too. You will also need Adobe Illustrator and Adobe Photoshop, because some of the exporting will go through them too. Personally I use Corel X4, Illustrator CS4 and Adobe Photoshop CS5.
Step 1 : Saving the CDR file
This is the easiest part. Just go to File > Save As, change the "Save as type" to CDR, and for "Version" select 9.0. Versions older than that are obsolete, plus - files in version 9 are proved to produce the best results for the purpose of microstock vectors. Where I'm from, all the advertising agencies use Corel Draw, and their requirement for the files is to be saved as version 9.0. This is only a problem if you want to use meshes, but since you are a Corel user you are not going to do that for your microstock illustrations. Don't feel bad about it though, because there are other ways to create great, realistic images. We will discuss them in another tutorial.
Step 2 : Saving the JPG file
You will also export the JPEG file from Corel. Go to File > Export > name the file and change the file type to JPEG. (Note that when you were saving the CDR file you used the SAVE AS option, and now you use the EXPORT option.) When you do this a menu will appear , called "Convert to Bitmap". In the image size options select the measures to be in pixels. Then change the longer of the two sides of the image to 4900 pixels. The "Maintain aspect ratio" options should be selected, and "Maintain original size" should not. The Resolution is 300 dpi.
Now you are probably wandering why you typed 4900 pixels for the longer side of your jpeg image. You do this for two reasons. The first is because it is a requirement in a microstock agency called Veer, the second is that all the rest of the agencies don't have such a requirement, but they want the jpeg image to be BIG. So when you save your file in that size and resolution everybody is happy and you don't have to save a different jpeg file for each agency.
Now lets continue with the rest of the options. For "Color Mode" you select RGB. You may be the best illustrator in the world, but I will say this anyway, just to remind you: "VECTORS IN CMYK, RASTERS IN RGB COLOR MODE". You know why? Because vector files will most likely be printed, and raster files will most likely be viewed on screen.
Another very important option here is the "Apply ICC profile" option. It should be on, active, checked, selected... If you don't do that you will see some very strange colors on your screen when you open your jpeg preview image. I don't want to bore you to death by talking about the ICC profile, so just trust me on this one. Or you can check the info about it in the Corel Help.
The last option that should be checked or selected is "Anti-aliasing". You save all the files in one folder. Don't make a new folder for each file type. Later you may need to create new folders for some of the agencies, but not for the file types.
Step 3 : Saving the Ai File
Now this here can make or brake your illustration. As you know, the most important vector file is the EPS file. But since Corel exports terrible EPS files - you are going to save an AI file, then open that file in Illustrator, and save the EPS file from there. That is why it is very important for your AI file to be perfect, or as close as perfect as possible.
So here is how you save it: Go to File > Save As and from the "Save as type" menu select "AI - Adobe Illustrator". Then set the options just like shown in Picture 1.

Notice that from the "compatibility" menu I have selected "Adobe Illustrator 8.0" This version of illustrator is the best combination between compatibility and file quality. However if you are using Corel Draw 12 or lower - you won't have that option, because Illustrator 8 was not created at that time. If this is the case - just save the file in the highest version possible. For Corel 12 this will be AI 7.0. Don't worry, this will work too. If you are using Corel X5 your menu will look a little different. Just set it like shown in Picture 2 and you will be OK.

Note that in all cases the option "Simulate complex filled curves" is NOT selected. This is the most important thing you need to remember when saving AI files from Corel. If you select this option Corel will automatically cut and chop your shapes into smaller shapes, and will make a complete mess of your AI file. Especially if you have used gradients.
Step 4 : Saving the EPS File
The EPS file is required by all the agencies you are submitting to. The saving of it is no different than the way most Illustrator users do it. That is because you are going to do it not from Corel, but from Illustrator as well. Why? Because Corel Corporation did a poor job with this. Yeah, I love you Corel staff guys, but you must admit you did terrible with the exporting of good EPS files. So, in Illustrator you go to File > Save As > and from the "save as type" list select EPS. Then set everything like shown in
Picture 3.
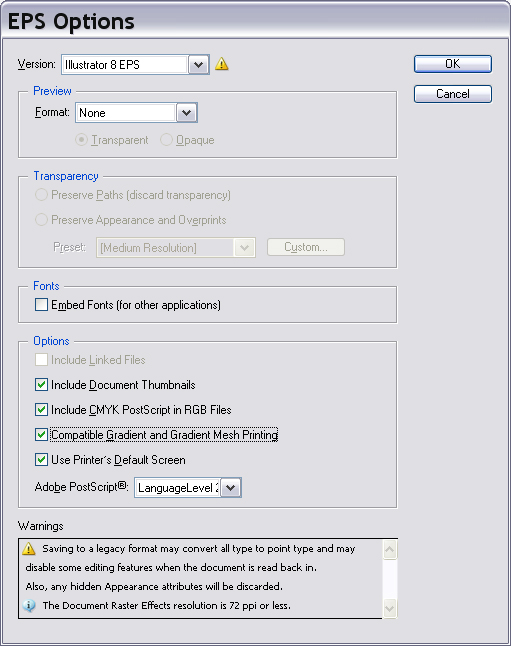
Note that the version in which you save the EPS file is also a lower version (version 8). The idea is more people to be able to open the file. Saving EPS files in version 8 is required by all agencies. However not all of them are so strict about this. They say you should save your EPS files in version 8, but if you send them file saved in the last version - most of them will not reject it. There are 2 main reasons for this. The first one is that some of them are too lazy to even check the version. But the main reason is that agencies are full of self doubts when it comes to vectors: They want all users to be able to open the EPS files, but in the same time they want all the cool effects, that can be saved only in the latest versions. They can't have both of those, and this confuses them a lot.
Luckily, as a Corel user you don't have this problem, because you can not use those fancy effects for microstock vectors anyway. By default you are choosing everybody to be able to use your files, and that is really a good thing.
You can check if you have saved the file properly by opening it with a text reader like Notepad. When you do that a list of strange text will appear. The first line is the most important, and it should look like this:%!PS-Adobe-3.0 EPSF-3.0
If it doesn't and especially if the numbers are not 3.0 but 3.1 for example, that means you did something wrong. Also if the EPS file is a lot bigger than the AI file. EPS are always a little bigger than AI files, but if they are like 5 times bigger - this means your file is not version 8.
Step 5 : Saving the PSD File
This file is optional. As a matter of fact none of the agencies require it. Personally I include a PSD file when my illustration contains a lot of layers. For example if I upload a set of icons I place each icon on a separate layer. Also the background is almost always on a separate layer, so the designer can easily select only the object, without having to cut it.
Here is how you do it: If you are using the latest Corel X5 you can export the PSD file directly from it. X5 exports good, and most of all LAYERED, PSD files (Unlike previous versions, which don't export layers in PSD).
If you use X4 or lower Corel versions - you will need to export the PSD file from Illustrator. But since you just used Illustrator for the EPS file it will not take you much time at all. Just do this: Go to File > Document Color Mode > RGB Color. Since the PSD file is raster it must be in RGB file. (Vectors CMYK, rasters RGB, remember!) After that go to File > Export > Save as Type > PSD and then set the options like in Picture 4.

Now open the file in Adobe Photoshop, and check if everything is OK. With me this is never OK. I always have to merge some unnecessary layers, to rasterize them, to rename them or to crop the entire image. I don't know why but sometimes the exported PSD files are a little larger than the original (like 1 more pixel from each side larger). When the file is like that it has a thin transparent frame around it. The easiest way for me to fix it is in Photoshop to go to Image > Canvas Size > and then to enter the original size parameters, like they are in the original Corel file.
Let's say you created your original file in A4 proportions. In centimeters it is 21.0 x 29.7. But when you open your PSD file in Photoshop it will be like 21.02 x 29.72. So I just delete the last figure "2" from those numbers and I am good to go. But remember to do that in the Canvas Size menu, and NOT in the Image Size menu. When you change those numbers Photoshop will ask if you are sure you want to crop your image. Say YES. It will only cut out those pixels that was not supposed to be there anyway.
At the end, when you are closing your EPS files in Illustrator don't forget NOT to save the changes that you just did. The change is that you switched the color mode of your file from CMYK to RGB just so you can export your PSD file. But if you choose to save changes to the file your EPS file will also be in RGB, which is bad.
Additional Files and Naming
OK, now you have your illustration in 5 different file types. If you have time you can save even more types like transparent PNG, PDF and many more.
The most important thing here is to put yourself in the position of the designer. Think about the way your illustrations will be used. For example if you are drawing web elements your raster files are even more important than the vectors. In this case it will be a big plus for you if you have transparent PNG file and PSD file layered properly. And if you are drawing a background or a poster - you don't need those at all. Your jpeg preview will be the only necessary raster file.
The ability to put yourself in the place of the designer is critical for the success of not only Corel users, but for all microstock illustrators. By helping the designer and providing the file types that they need - you make them come back for more, and that means more sales for you.
In some cases the designer will come back for more, but you will not have what he or she is looking for. This is great! It means that you will most likely be hired to draw what they want, and this time you get all the money.
But lets get back to your files. Make sure that all of them have the same name. They should be different only by their file type extension. This is important, because when you upload them in some agencies and the JPEG file doesn't match exactly the EPS file - the automatic upload system assumes that you are uploading two different illustrations. Now select your 5 files and ZIP them. Even if you are using WinRAR, like me, still ZIP them. The microstock agencies accept only ZIP archives. This archive is actually your "main" file for GraphicRiver, for Fotolia, for DepositPhotos and for some other agencies.
Depending on the agency you will have different requirements for your uploading process. Some of them will want your ZIP archive, others will want only the JPEG and EPS files, and still others will want ZIP archives, but with different content. For example Istockphoto will want this archive to contain only the additional files (AI, CDR, PSD, PNG) without the EPS and JPEG files. Vectorstock will want from you to archivate only the EPS file, and so on. But no matter how strange those requirements are - your files will be liked by all.
Conclusion

This whole saving and exporting looks like a lot of work, but when you get used to it you will do it very quickly. For me it doesn't take more than 2 minutes. What takes more time however is making some preview images and thumbnails for agencies that don't generate them automatically (Vectorstock, GraphicRiver). But you don't have to be a Corel user in order to waste time that way.
So, at the end let's summarize the process of saving microstock vectors for Corel users. First you save your CDR file in version 9. Then you export a JPEG preview. Next is the AI (version 8 ) file, which you save also in Corel. You open that AI file in Illustrator, and from there you save the EPS (version 8 ) file. At the end if you want you can save additional files like EPS, PNG, PDF.
There may be other methods to do this of course. This is only my way, and so far it works. But if you know something more - please share it in the comments. We, Corel Drawers, are a minority around here, so it will be great if we can learn from each other with the help of vector.tutsplus.com.
