1. Downloading and Locating the Logo Template
Step 1
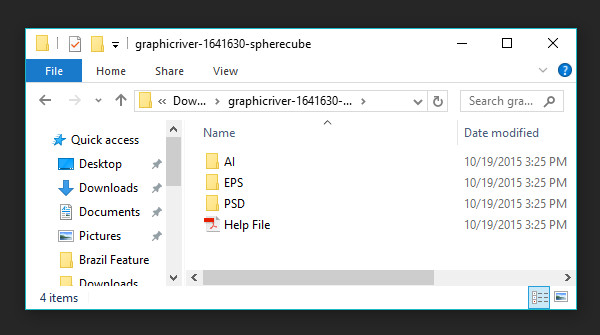
First things first: we need to download the logo template file. I'll be using a logo called SphereCube, which I purchased on GraphicRiver.Once your file is downloaded, unzip the folder. If your OS is Windows, Right-Click the zipped folder and hit Extract All, and if you're on a Mac, Double-Click the folder to extract its contents.
Once decompressed, you'll find the folder has some files. This logo template has three types: AI, EPS, and PSD. We'll be working with the AI files for this tutorial.

Step 2
Let's start with one of the simplest AI files in the logo folder: spherecube_black_white_single_color.ai. Open it in Adobe Illustrator and check out your two options in the Layers panel: black on white or white on black.
2. Easily Changing the Logo's Color
Step 1
Select the aperture shape and either double-click the Fill color in the Toolbar to bring up the Color Picker, or modify the color of the object from your Swatches or Color panels.
Step 2
Your new logo's color is an easy change, especially when it's a simple object and you're looking for a flat fill color as your change.
Step 3
You can also select each individual object with the Direct Selection Tool (A) and change their fill colors or add a gradient if that's your preference.
3. Recoloring the Logo Template
Step 1
Let's open a different logo template from the file. I opted for spherecube_Green.ai, which has gradient shapes versus flat filled shapes. While you can change the color of the logo in the Gradient panel, let's use an alteration method that may be your go-to for editing templates that are more complex than this: Recolor Artwork.
Step 2
Select your logo group and go to Edit > Edit Colors > Recolor Artwork. Both colors in the gradient will be shown under Current Colors. Double-Click the swatch under New and select a new color for each. In this case I've chosen pink and dark pink. Make sure Recolor Art is selected and hit OK once satisfied with your color changes.
Step 3
The nice thing about using the Recolor Artwork panel is that the more complex your object or artwork is, the easier it is to change its colors without messing up any effects, gradients, or other appearance attributes.
Step 4
You can also match any type or additional objects to your logo's colors. In the case of this type object, simply highlight portions with the Type Tool (T) and select colors from the Color or Swatches panel as you would any other type.This works because the type wasn't converted to outlines. Any text that has been converted to an outline can be recolored like any other object.

4. Editing Logo Templates in CorelDRAW
Step 1
Open the AI file of your choice in CorelDRAW. EPS files won't render in the same way, so your best bet is to simply import an Adobe Illustrator file from the downloaded logo template.
Step 2
Select your logo object, and in the Object Properties docker you can change the Fill attributes under Fill. In this case, I've selected Fountain Fill and will simply select each color on either side of the gradient to change them.Make sure you stick with the tone of the previous gradient: lighter colors should remain lighter and darker colors should remain darker, so that the logo's shadows look similar.

Step 3
Select text with the Text Tool and edit it in the Object Properties docker. In this case I've selected the word "Cube" and will change the Uniform Fill from green to blue to better match the logo design.
Great Job, You're Done!
In this quick tutorial we downloaded a logo template and learned how to edit its colors and attributes in both Adobe Illustrator CC and CorelDRAW. You'll find thousands of logo templates online from sites like GraphicRiver, and knowing how to edit them for your needs is a great start to speeding up your design process and making the best out of stock assets.
Advertisement